How to Build a WordPress Child Theme – Safe Customization Tips
If you’re using WordPress and want to customize the design or functionality of your theme without losing your changes during updates, creating a child theme is the smartest and safest way to do it. Losing the changes after an update is frustrating and impacts your website performance, branding, and user experience.
Understand the step-by-step process of creating a child theme manually and using plugins. This blog includes essential code examples, best practices, and effective child theme customization for faster website performance. Whether you are an SEO expert optimizing site structure or a developer building advanced features, this guide is for you.
What is a Child Theme and Why Use One?
A child theme in WordPress is a sub-theme that inherits the functionality, features, and styling of the parent theme. This gives authority to make any changes and customizations to your site without touching the core files of the parent theme. A child theme allows you to:
- Preserve customizations: Since you never modify the parent theme’s files, updates to the parent won’t wipe out your changes.
- Save development time: You only write new code for custom styles or features, rather than building a theme from scratch.
- Learn theme development: Child themes offer a secure way to start building and customizing themes, providing a foundation to eventually create or develop custom themes if needed.
- Maintain portability: By keeping all your changes in the child theme, managing, migrating, or tracking them with version control becomes easier.
In short, a child theme is like a transparent layer atop the parent: it applies your tweaks only and leaves the original theme code untouched. This is the most reliable way to safely customize a WordPress theme.
Manual Method: Creating a Child Theme by Hand
To create a child theme manually, simply set up a new theme folder and include the style.css and functions.php files.
Follow these steps on a development or staging site first:
Step 1. Create the Child Theme Folder
Within the WordPress installation, open the wp-content/themes/ directory and create a new folder for your child theme. Use a unique, descriptive name, e.g., twenty_nineteen-child. This slug will be the template reference later, so use the parent’s folder name plus “child” or similar.
Step 2. Add style.css with a Proper Header
Add a file named style.css to the folder of your child theme. At the very top, put the theme header comment.
For example:
/*
 Theme Name:   Twenty Nineteen Child
 Theme URI:    https://example.com/twenty-nineteen-child
 Description:  Child theme for the Twenty-Nineteen theme
 Author:       Your Name
 Author URI:   https://example.com
 Template:     twenty_nineteen
 Version:      1.0.0
*/
The crucial line here is Template:. It must match the folder name of the parent theme exactly (in this case, twenty_nineteen).
WordPress won’t recognize your theme as a child theme unless the Template header is included in the style.css file.
You can optionally copy the parent theme’s screenshot.png into your child theme folder so WordPress shows a thumbnail in the dashboard.
Step 3. Create functions.php to Enqueue Styles
Next, create a file named functions.php in the child theme folder. This file lets you add or override PHP functions. At a minimum, you should enqueue the parent theme’s stylesheet (optionally your own).
For example:
<?php
// Child theme functions.php

function mytheme_enqueue_styles() {
    // 1) Enqueue the parent theme's style.css file
    wp_enqueue_style(
        'parent-style',
        get_template_directory_uri() . '/style.css'
    );
    // 2) Enqueue child theme style.css so it loads after parent
    wp_enqueue_style(
        'child-style',
        get_stylesheet_directory_uri() . '/style.css',
        array('parent-style')  // make sure parent style is a dependency
    );
}
add_action('wp_enqueue_scripts', 'mytheme_enqueue_styles');
This code uses wp_enqueue_style() hooked to wp_enqueue_scripts. The parent theme’s CSS is loaded first using get_template_directory_uri() . ‘/style.css’, followed by the child theme’s CSS, which is loaded via get_stylesheet_directory_uri() . ‘/style.css’ as a dependency.
By enqueuing this way, your child theme styles override the parent’s when needed, and WordPress ensures correct loading order. (You can include your version number or use wp_get_theme()->get(‘Version’) to help with browser caching.)
Step 4. Activate the Child Theme
Log in to your WordPress dashboard, navigate to Appearance → Themes, and you should see your new child theme listed using the name specified in style.css.
Activate it first on a staging site. WordPress will combine parent and child files on the front end: it uses the parent template files unless your child theme includes copies. So far, you’ve only added the style enqueue, meaning no visual changes.
Customizing Templates and Adding Functions
With your child theme set up, you can start customization:
- Override templates: To change a theme template (e.g., header, footer, single post, etc.), copy the parent’s file into your child theme folder (preserving any subfolder structure) and edit the copy. When a file exists in the child theme, WordPress will use it in place of the corresponding file in the parent theme. For example, to change the header, you’d copy wp-content/themes/twentynineteen/header.php into twenty_nineteen-child/header.php and modify it.
- Add new templates or parts: You can also add entirely new template parts or pages in the child theme. Just ensure they have unique filenames. (for example, page-about.php for a specific page).
- Add or override functions: Put custom PHP code in your child theme’s functions.php. You could add new widget areas, modify menu behavior via add_filter, or enqueue extra scripts. Remember to prefix your function names to avoid name collisions with the parent theme or plugins.
- Use hooks and filters: Whenever possible, use WordPress action hooks and filters instead of editing parent files. For instance, instead of hard-coding something into a template, check if the parent theme offers a hook (like do_action(‘mytheme_after_content’) or apply_filters(‘mytheme_title’, $title)) and attach your code in the child theme via add_action() or add_filter(). Hooks let you “insert” or modify behavior cleanly.
Tip: Only override or create what you need. Copying every template is not required and can lead to maintenance headaches. Stick to the files you want to change.
Using a Plugin (Child Theme Configurator)
If you prefer a UI to code, the free Child Theme Configurator plugin (by Lilaea Media) can generate a child theme for you. Here’s the workflow:
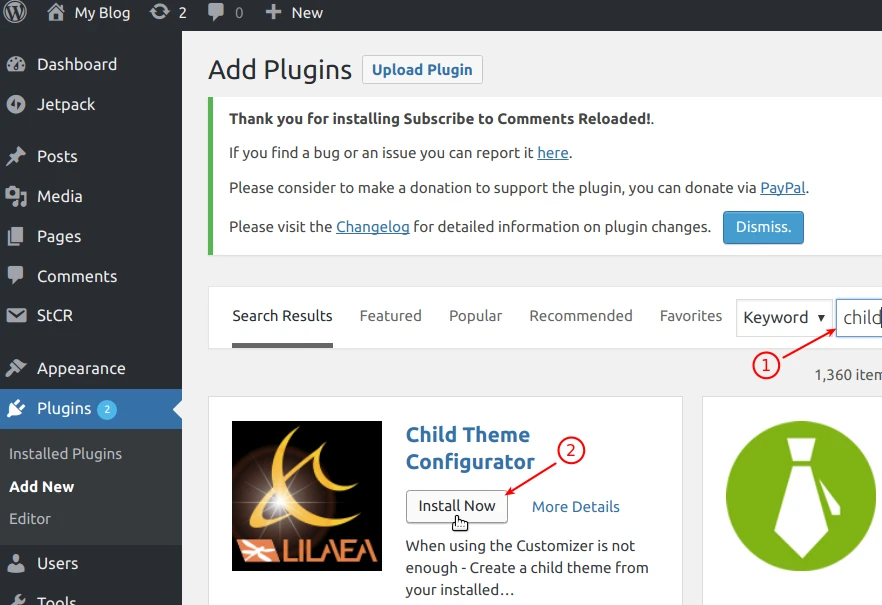
Step 1. Install and activate the plugin
Navigate to Plugins → Add New in your WordPress admin, search for “Child Theme Configurator,” then click Install Now and Activate.
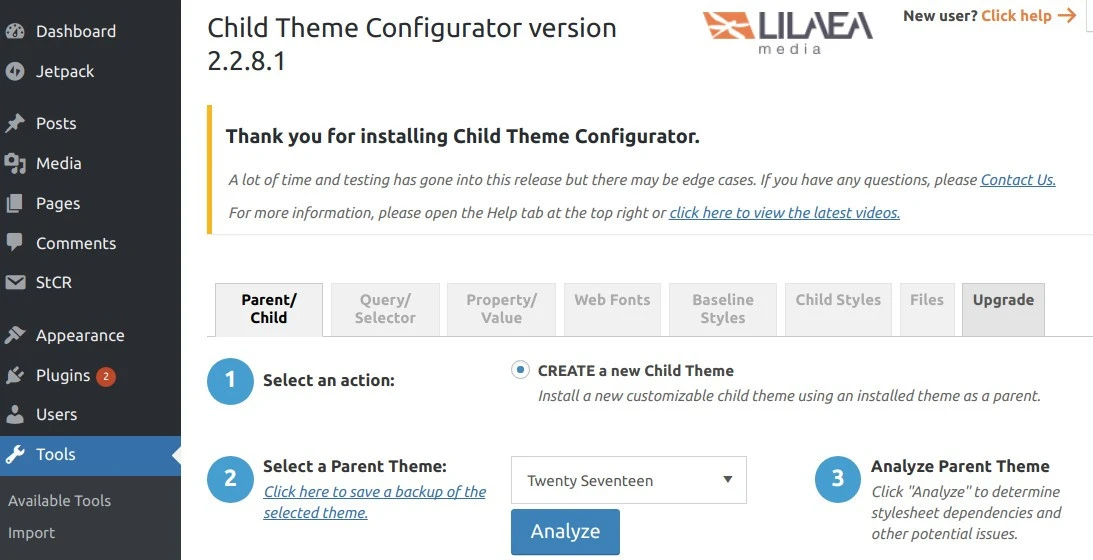
Step 2. Generate a Child Theme
After activation, go to Tools → Child Themes. In the Parent/Child tab, select your current parent theme from the dropdown menu and click Analyze. The plugin will then determine if it can generate a child theme for it.
Step 3. Configure and create
Once the analysis process is completed, you can enter details for the child theme (name, description, author, etc.). There are options to copy parent theme menus, widgets, etc. Choose how to handle styles:
- The default “Enqueue parent stylesheet” works for most themes.
- If your styles aren’t applying, you can try “Enqueue both parent and child” or even @import (though @import is generally discouraged).
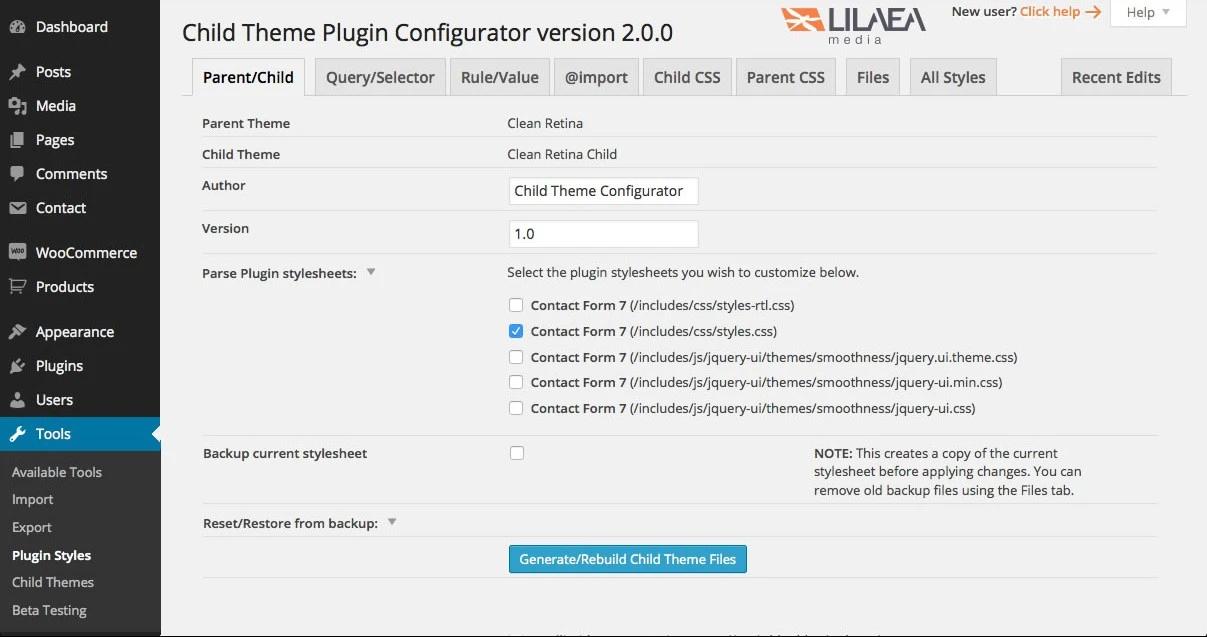
When ready, click Generate/Rebuild Child Theme Files.
Step 4. Preview and activate
Before activating, click the Preview child theme. Check that everything looks correct. This is important to avoid breaking your live site. If it looks good, click Activate & Publish in the Customizer.
The plugin handles the heavy lifting (file creation, proper enqueuing, and even CSS editing tools). It ensures the child theme is set up according to WordPress best practices. After generation, you can further tweak the child theme via the plugin interface.
Common Mistakes to Avoid
When working with child themes, watch out for these pitfalls:
- Always use wp_enqueue_style() in your child theme’s functions.php to load the parent theme’s stylesheet. Skipping this will break the styling of your site.
- The Template line in style.css must match the parent theme’s folder name. Any typo will prevent WordPress from recognizing the child theme.
- Do not use @import to load the parent stylesheet, as it is outdated and slows down your site. Instead, properly enqueue styles using wp_enqueue_style().
- Duplicating unnecessary files can create maintenance challenges and may break features during theme updates. Less is more for stability.
- Test your child theme on a staging site or use the WordPress Customizer preview to safely review changes. Avoid applying modifications directly to a live site.
- If you add functions in the child theme, use unique prefixes (e.g., mytheme_…). Don’t overwrite parent functions unless you intentionally hook or remove them.
By following best practices, correct headers, enqueuing, and selective overrides, you’ll avoid these common issues.
How to Test Your WordPress Child Theme?
Before going live, thoroughly test your child theme:
- Use a staging site: Never activate a new theme on your production site without testing. Use a local or staging environment (most hosts provide one) to avoid downtime.
- Enable WP_DEBUG: Turn on WP_DEBUG (in wp-config.php) to catch any PHP notices or errors. Look at the debug log (wp-content/debug.log) for issues when you load pages with your child theme.
- Browser dev tools: Check the console for JavaScript errors. Use “Inspect Element” to verify that your CSS is being applied as expected.
- Responsive and cross-browser testing: Manually resize your browser or use tools (Chrome DevTools device emulator) to check responsiveness. Test in multiple browsers (Chrome, Firefox, Edge, Safari).
- Validate HTML/CSS: Run your modified templates through validators (W3C Validator) to catch broken markup. One bad HTML tag can disrupt SEO and layout.
- Check menu and widget placement: If you copied functions.php or other files that register menus/widgets, ensure your locations still work. Sometimes, child themes may need to re-register menus.
- Use the Live Preview: When using the Child Theme Configurator plugin, always use the Preview in the Customizer before activation. This warns you of obvious breakages. Even without the plugin, WordPress’s Customizer (Appearance → Customize) can preview theme changes safely.
- Try Query Monitor: A plugin like Query Monitor can show slow database queries or PHP warnings introduced by your child theme.
After thorough testing, publish the child theme. Go live confidently knowing your custom code works and your site still functions correctly.
Conclusion
Using a child theme is the most reliable way to customize your WordPress site without risking your changes during theme updates. It allows you to safely modify the design, add custom functions, and optimize your site for performance and SEO. Whether you followed the manual method or used a plugin, a child theme is a solid foundation to build and maintain an update-safe WordPress site. Take your time to understand this theme and follow best practices to make your site both stable and future-ready.
Read AlsoWhy Website Speed Optimization Matters in 2025
How To Increase Page Views And Reduce Bounce Rate On WordPress Site
Frequently Asked Questions
1. Does a child theme slow down my website?
No, a child theme does not significantly impact the performance. WordPress efficiently loads both child and parent theme files, and any difference is minimal.
2. Where should I create the child theme folder?
Create the folder within your WordPress installation at: /wp-content/themes/your-child-theme-name
3. Can I override PHP template files in the child theme?
To customize, simply copy the template file (such as single.php or page.php) from the parent theme into the child theme folder, and WordPress will utilize the child version.
4. Is it possible to add custom page templates in a child theme?
Create a new PHP file within your child theme directory and include the following template header at the beginning:
<?php
/**
 * Template Name: Custom Page
 */
5. What is the best plugin to create a child theme in WordPress?
The Child Theme Configurator is the most widely used and user-friendly plugin, providing a guided interface for the secure creation and customization of child themes.